The Ultimate Shutter Guide for Northern Idaho Homes: Choosing the Right Frame, Material & Configuration
From lakeside humidity to deep winter temperature swings, Northern Idaho homes ask a lot from their window shutters. This guide breaks down the best frame types, materials, and configurations — so you can choose shutters that look beautiful, function perfectly, and last for decades.
By Mark Abplanalp
Choosing the Right Frame, Material & Configuration
By Mark Abplanalp, Owner of Luxe Window Works | Custom Window Coverings | October 30, 2025 | 17 min read
From lakeside humidity to deep winter temperature swings, Northern Idaho homes ask a lot from their window shutters. In this guide, we break down the best frame types, materials, and configurations — so you can choose shutters that look beautiful, function perfectly, and last for decades.
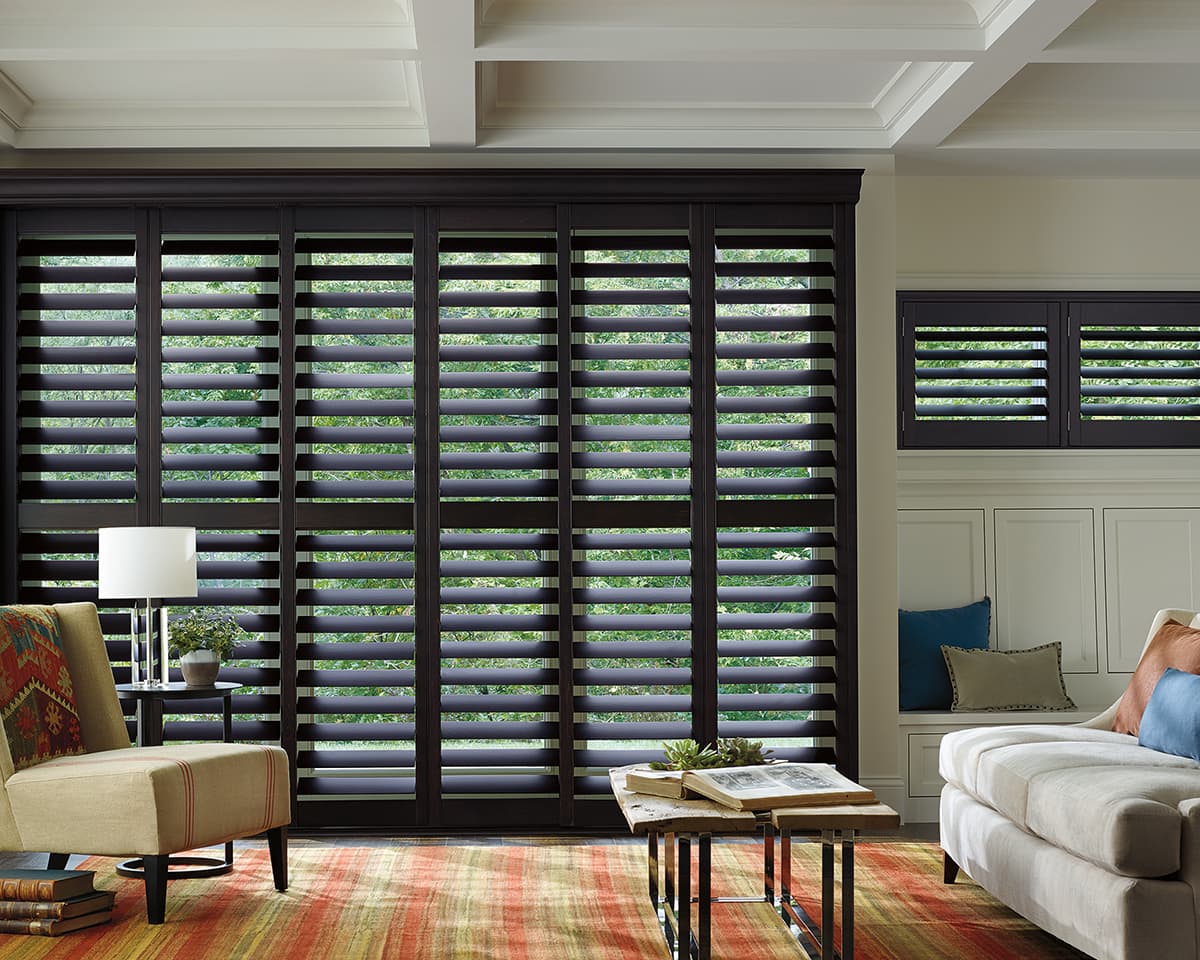
Plantation shutters look incredible in photos. They promise light control, privacy, and that clean, architectural finish that makes a room feel complete. But here's what most Northern Idaho homeowners don't realize until they're standing in a showroom: the frame type, material choice, and panel configuration you select will directly affect how your shutters function, how they fit your specific windows, and whether you'll still be able to open those windows when you need fresh air in July.
This isn't about picking a color and calling it done. It's about understanding window depth, obstruction clearance, moisture exposure, and how your daily routine interacts with the way shutters swing, tilt, and mount. If you're considering shutters for your Coeur d'Alene, Post Falls, or Sandpoint home, this guide walks you through every decision that actually matters — no invented case studies, no vague promises, just the technical and practical realities we see in real Northern Idaho installations every week.
Understanding Shutter Frame Options
The frame is the structural perimeter that holds your shutter panels. Most homeowners assume all frames are the same — but the type of frame you choose determines how the shutters mount, how they clear obstructions, and what kind of finish you'll see around the edges. Here's what you need to know about the three most common frame types.
Z-Frames: Best for Windows Without Existing Trim
A Z-frame gets its name from its profile shape when viewed from the side — it looks like the letter "Z." This frame is designed specifically for windows that don't have existing trim or casing — typically drywall returns or builder-grade windows where no wood trim was installed. The Z-frame creates the finished edge around the window opening, essentially serving as both the shutter frame and the trim.
When to use a Z-frame:
- Your windows have drywall returns with no wood trim
- You want the shutters to create a finished, built-in look
- You need a frame that functions as both mounting structure and trim
- You have adequate depth for louver clearance (more on this below)
What makes Z-frames work well: They give you a clean, architectural finish on windows that would otherwise need trim installed separately. The frame becomes the visual edge of the window, so when the shutters are closed, everything looks intentional and cohesive.
What to watch for: Z-frames require enough depth inside the window opening for both the frame and the louvers to operate without hitting glass, locks, or cranks. If your window is shallow or has obstructions, a Z-frame may not be the right choice.
L-Frames: Ideal for Outside Mounts or Limited Depth
An L-frame has a simpler profile — again, named for its shape — and it's designed for outside-mount installations or situations where an inside mount won't work due to depth restrictions, obstructions, or non-square openings.
When to use an L-frame:
- Your window lacks sufficient depth for an inside mount
- You're mounting over drywall returns with no trim or casing present
- Your window opening is out of square and you need flexibility in positioning
- You want to cover the entire window frame for maximum light blockage
What makes L-frames versatile: Because they mount to the wall or trim surface rather than inside the opening, they give you more control over placement. You can position them to avoid cranks, adjust for uneven walls, or simply cover more surface area for better light control.
Trade-off: L-frames project outward from the wall, adding visual depth to your window. This isn't a problem in most rooms, but it's worth considering if you have furniture close to the window or want the slimmest possible profile.
Behind-Mount Hang Strips: Best for Windows with Existing Trim
This is the most common mounting method for windows that already have wood or composite trim installed. Instead of adding a bulky frame, hang strips are mounted behind the existing casing, allowing the shutter panels to hang directly within the trim opening. This creates the cleanest possible look — minimal light gaps, no added visual bulk.
When this works best:
- You have windows with existing trim or casing (the most common scenario in Northern Idaho homes)
- You want the shutters to look built-in without adding extra framing
- Your window has adequate depth for louver operation
- You're working with an experienced installer who understands precise measurements
Why it matters: Hang strip mounting is the go-to method for nearly all trimmed windows because it preserves the existing architecture while giving you a tight, custom fit. The shutters appear to float within the trim, and because there's no additional frame projecting into the room, you maximize both the view and the usable space.
What to watch for: This method requires precise measurements. If the opening isn't square or measurements are off, you'll have alignment issues or light gaps. It also requires adequate depth for both the hang strip hardware and louver clearance.
Watch for These Window Obstructions
Before you commit to any frame type, walk through your home and inspect every window you're planning to shutter. Look for:
- Window cranks or levers (common on casement windows)
- Lock hardware that protrudes into the opening
- Alarm sensors or contact switches mounted on the frame
- Tilt latches on double-hung windows that could interfere with shutter clearance
These obstructions don't mean shutters won't work — they just mean you need to plan around them. Sometimes that means choosing an L-frame for extra clearance. Sometimes it means adjusting the louver size or panel configuration. Sometimes it means mounting slightly outside the opening to avoid contact altogether.
Pro tip: Take photos of your window hardware before your consultation. It helps your installer recommend the right frame and configuration without needing to schedule a second site visit.
Why Window Depth Matters More Than You Think
Here's the analogy that makes this click for most homeowners: operating shutter louvers inside a shallow window opening is like trying to open a door in a tight hallway. If there's not enough clearance, the door — or in this case, the louver — can't swing freely. It hits the wall, the glass, or the hardware.
Shutter louvers need space to tilt open without obstruction. The clearance requirement is measured from the center of the T-post (the vertical stile where louvers attach), so when louvers are fully open, they extend equally forward and backward from that center point.
Depth required by louver size:
| Louver Size | Depth Required |
|---|---|
| 2.5-inch | ~1.5 inches |
| 3.5-inch | ~2.0 inches |
| 4.5-inch | ~2.5 inches |
The measurement is consistent across louver sizes because it's about clearance from the center mounting point, not the full span of the louver itself. When a 4.5-inch louver is fully open, it extends about 2.25 inches in front of the T-post and 2.25 inches behind it — so 2.5 inches of total depth keeps everything clear of glass, frames, and hardware.
What to do if your depth is limited:
- As long as you have 2.5 inches of depth, any standard louver size will work
- If your depth is less than 2.5 inches (rare), use an L-frame for an outside mount, which eliminates the depth concern entirely
- Consider cellular shades or solar shades if airflow and view are priorities and depth is severely limited
Special consideration for tilt-in windows: If you have double-hung windows with tilt-in sashes for cleaning, inside-mounted shutters will physically block the tilt-in function. You'll still be able to raise and lower the window for airflow, but cleaning will require outside access. If you rely on the tilt-in feature regularly, discuss this with your installer — an outside-mount L-frame is the only configuration that preserves it.
Comparing Shutter Materials: Pros & Cons
Not all shutters are made from the same material, and your choice will affect weight, durability, moisture resistance, and price. Here's what you need to know about the four main options.
Poly Shutters (PVC/Polyresin)
Poly shutters are made from molded plastic — either solid PVC or a polyresin composite. They're affordable, moisture-resistant, and popular for bathrooms, kitchens, and high-humidity areas.
Advantages: Resistant to moisture and humidity (won't warp or crack), generally the most affordable option, easy to clean and maintain.
Disadvantages: Heavier than wood (can lead to sagging on larger panels), limited color options (usually white or off-white), can feel less premium compared to wood or composite.
Best for: Bathrooms, laundry rooms, kitchens, or lakefront homes where moisture exposure is a concern.
Composite Shutters
Composite shutters blend wood fibers with synthetic binders to create a material that looks like painted wood but resists moisture better. They're more stable than poly and lighter than solid PVC.
Advantages: More dimensionally stable than poly, looks and feels more like real wood, good moisture resistance without the weight penalty of solid plastic.
Disadvantages: Heavier than real wood, more expensive than poly, not as moisture-proof as aluminum or solid PVC.
Best for: Living rooms, bedrooms, and dining areas where you want the wood look without the maintenance sensitivity of real wood.
Real Wood Shutters
Real wood shutters — typically made from basswood, poplar, or alder — are lightweight, elegant, and offer the most premium appearance. They can be painted or stained to match any interior.
Advantages: Lightweight (reduces stress on hinges), premium look and feel, widest range of finish options (paint, stain, custom colors).
Disadvantages: Sensitive to moisture (not recommended for high-humidity areas), more expensive than poly or composite, requires occasional maintenance.
Best for: Dry-climate rooms, formal living spaces, master bedrooms, and areas where aesthetics and weight are priorities over moisture resistance.
Aluminum Shutters (e.g., Aviner by The Window Outfitters)
Aluminum shutters are a newer, high-performance option. They're ultra-stable, completely moisture-proof, and offer a sleek, modern aesthetic. What surprises most people is that interior aluminum shutters are priced competitively with composite — not significantly more expensive.
Advantages: Extremely stable (no sagging, warping, or expanding), completely waterproof, minimalist clean-lined appearance, long-term durability with virtually no maintenance, competitively priced with composite shutters.
Disadvantages: Limited color and finish options compared to wood, may not suit traditional or rustic interiors.
Best for: Modern builds, high-moisture areas, lakefront homes, and homeowners who want the most durable, low-maintenance option without a significant price jump over composite.
Tilt Options, Divider Rails & Panel Integrity
How you operate your shutters — and how the panels are structured — will affect both daily usability and long-term durability.
Traditional Tilt Rod vs. Hidden Tilt
Traditional tilt rod: Visible, centered bar on the front of the panel. Classic plantation shutter look, easy to use and maintain. If the rod comes loose, it's a simple fix.
Hidden tilt: No visible rod — louvers tilt by pushing on the edge of any individual louver. Cleaner, more modern appearance, but a slightly more complex mechanism that can require adjustment over time.
Which should you choose? If you value aesthetics and a modern look, hidden tilt is the way to go. If you prioritize simplicity and ease of maintenance, traditional tilt rods are more forgiving.
Split Tilt with Hidden Control
A split-tilt system allows you to control the top and bottom sections of louvers independently — without a horizontal divider rail. This gives you privacy on the bottom half while keeping the top half open for light and view.
Trade-off: Split tilt requires more precise manufacturing and slightly more complex operation. It's not available on all shutter lines, so confirm compatibility if this feature matters to you.
Divider Rails: Function & Strength
A divider rail is a horizontal bar that splits the panel into upper and lower sections. Each section tilts independently — similar to split tilt — but the rail also serves a structural purpose.
When to use them: Tall windows or doors, situations where you want independent top/bottom control, and panels where structural integrity is a concern (large, wide panels in poly or composite). Especially important on panels over 60 inches tall.
When to skip them: Short to medium-height windows (under 48 inches), situations where you want a clean uninterrupted look, or if you're using split tilt with hidden control instead.
Planning Your Panel Configuration
Shutters are mounted on hinges, which means they swing open like cabinet doors. If you don't think through panel swing, furniture placement, and window access, you'll end up with functional problems that aren't obvious until installation day.
Panel Swing vs. Room Layout
Before you finalize your shutter order, stand in front of each window and ask: Where will the panels swing when fully open? Is there furniture, a deep sill, or a wall that will block the swing? Do you need to open the window regularly for airflow?
Common issues we see:
- Shutters that swing into a nightstand or dresser
- Panels that can't open fully because of a deep window sill or nearby bookshelf
- Shutters that block window cranks or lock hardware when open
Solutions:
- Use bi-fold panels (two panels per side that fold back on themselves) for tight spaces
- Split wide windows into multiple panels so you can open just the section you need
- Plan furniture placement around shutter swing, especially in bedrooms
Tilt-In Window Considerations
If you have double-hung windows with tilt-in sashes, any inside-mounted shutters — whether on hang strips or with a Z-frame — will prevent those sashes from tilting inward for cleaning. The shutter panels or mounting hardware physically block the sash from pivoting into the room.
Your options:
- Accept that you'll lose the tilt-in cleaning function (you can still open the window for airflow, but exterior cleaning requires outside access)
- Choose an outside-mount L-frame, which doesn't interfere with the tilt mechanism
- Use removable shutter panels that can be lifted off the hinges when needed (less common, requires planning)
For most homeowners, the trade-off is worth it — shutters provide year-round benefits while tilt-in cleaning is occasional — but it's your call to make with full information.
Common Questions About Plantation Shutters in Northern Idaho Homes
Can I still open my window for airflow in summer if I have shutters?
Yes, absolutely. Shutters are mounted on hinges, so you can swing the panels fully open to expose the window and operate it normally for fresh air. What shutters do affect is the tilt-in cleaning feature on double-hung windows. If you have inside-mounted shutters, you won't be able to tilt the sash inward for cleaning. If you rely heavily on that feature, discuss it with your installer — an outside-mount L-frame is the only configuration that preserves tilt-in functionality.
Will plantation shutters block my view of the lake?
When the louvers are fully open, you'll have nearly unobstructed views — the louvers lie flat and the frame is minimal. However, the shutter frame itself will always be visible around the perimeter. If you have a prized lake view, consider using shutters only on windows where privacy and light control matter more than sightlines, and choosing solar shades or no treatment at all on your lake-view windows. Alternatively, choose 4.5-inch louvers and minimal framing to maximize the view when open.
What shutter material is best for high-humidity areas in Northern Idaho?
For bathrooms, kitchens, laundry rooms, and lakefront homes in Northern Idaho, poly (PVC/polyresin) or aluminum shutters are the best choices. Both materials are moisture-resistant and won't warp, crack, or swell with humidity changes. Real wood shutters should be avoided anywhere with consistent steam or condensation. Composite shutters handle occasional moisture reasonably well but aren't ideal for daily steam exposure. When in doubt, aluminum shutters offer the highest moisture resistance with the longest lifespan — and they're priced competitively with composite.
How much window depth do I need for plantation shutters?
The key measurement is 2.5 inches of depth inside your window opening, measured from the front of the frame to the glass or nearest obstruction. Here's what makes this surprisingly simple: all standard louver sizes — 2.5-inch, 3.5-inch, and 4.5-inch — require the same 2.5 inches of clearance. The measurement is taken from the center of the T-post, so louvers extend equally forward and backward. If you have 2.5 inches of depth, you can choose any louver size based purely on aesthetics. If your depth is less than 2.5 inches, an outside-mount L-frame eliminates the depth concern entirely.
What is the difference between a Z-frame and an L-frame shutter?
A Z-frame is designed for inside-mount installations on windows without existing trim — it serves as both the shutter frame and the finished trim edge. It's ideal when you have drywall returns and want a built-in, architectural look. An L-frame is designed for outside-mount installations or windows with limited depth — it mounts to the wall or trim surface rather than inside the opening. The key practical difference: Z-frames require adequate window depth and work best on untrimmed windows; L-frames give you more flexibility for shallow windows, out-of-square openings, and windows where you want to preserve tilt-in cleaning functionality.
Do I need a divider rail on tall shutter panels?
For panels over 60 inches tall, a divider rail is strongly recommended — especially in poly or composite materials. Tall panels without structural support can flex and sag over time, which affects both appearance and operation. A divider rail adds a horizontal bar that splits the panel into upper and lower sections, each tilting independently, while also adding rigidity that prevents long-term sagging. If you don't like the visual break of a divider rail, ask about split tilt with hidden control — it gives you independent top/bottom operation without the visible rail, though it requires more precise manufacturing.
Are aluminum shutters more expensive than composite shutters?
No — and this surprises most homeowners. Interior aluminum shutters are priced competitively with composite shutters, not significantly more expensive. Many people assume aluminum is a premium upgrade with a premium price tag, but that's not how the market works for interior shutters. The real difference is performance: aluminum shutters are completely moisture-proof, won't sag or warp, and require virtually zero maintenance over their lifespan. If you're choosing between composite and aluminum and durability matters to you, aluminum is often the smarter long-term value — especially for lakefront homes or high-moisture environments in Northern Idaho.
Mark's Top 5 Tips for Choosing Shutters in Northern Idaho
Tip 1: Understand that 2.5 inches of depth works for any louver size
One of the most common misconceptions is that larger louvers need more depth. In reality, all standard louver sizes — 2.5-inch, 3.5-inch, and 4.5-inch — require the same 2.5 inches of clearance, because the measurement is taken from the center of the T-post, not the window frame edge. As long as you have 2.5 inches of depth, you can choose any louver size based on aesthetics and view preference. If your depth is less than 2.5 inches (which is rare), that's when you'll need an outside-mount L-frame or a different treatment entirely.
Tip 2: Plan around obstructions, not against them
Window cranks, locks, alarm sensors, and tilt latches are common in Northern Idaho homes, and they're almost always in the way of something. Don't assume your installer will figure it out on installation day. Walk through your home, note every obstruction, and discuss it upfront. In many cases, an L-frame or a slight panel configuration adjustment solves the problem. Either way, it's better to know now than after the shutters are built.
Tip 3: Consider Aviner aluminum shutters — they're priced like composite, not luxury upgrades
If you're building a modern home with steel or aluminum-clad windows, or live on the lake and want zero maintenance, Aviner shutters are worth serious consideration. Many homeowners assume aluminum shutters carry a premium price tag, but they're actually competitively priced with composite. They're the most durable, moisture-proof option available — a natural fit for contemporary Northern Idaho homes with clean lines, large windows, and open floor plans.
Tip 4: Use split tilt or divider rails for tall windows — don't skip the structural support
Tall windows (over 60 inches) put stress on shutter panels, especially in poly or composite materials. A divider rail adds structural rigidity and prevents sagging over time. If you don't like the look of a divider rail, ask about split tilt with hidden control — it gives you independent top/bottom operation without the visual break. Either way, don't skip structural support just for aesthetics. Sagging panels are a long-term headache, and they're preventable.
Tip 5: Think about swing direction and furniture before finalizing your order
Stand in front of each window and physically act out opening the shutters. Where do they swing? Is there a nightstand, dresser, or bookshelf in the way? Can you still reach the window crank or lock? If the answer to any of these is "no," adjust your panel configuration now — not after installation. Bi-fold panels, split configurations, or simply moving furniture a few inches can solve most issues. But you have to think through the swing before the shutters are built.
Continue Exploring Shutters
- Woodlore Plus shutters in North Idaho — why composite beats wood for Coeur d'Alene homes
- Norman shutters in North Idaho — Normandy, Woodlore Plus, and InvisibleTilt design
- The hidden value of plantation shutters for Northern Idaho luxury homes
- The future is aluminum — Highprofile Avenir interior shutters for modern homes
- Lockable aluminum exterior shutters for 4-season patios in North Idaho
- The Norman BiFold 180 for bi-folding doors in Northern Idaho
- How to measure and install plantation shutters like a pro (DIY guide)
Need Help Choosing the Right Shutter Setup?
Plantation shutters are an investment — both financially and in terms of how they affect your daily life at home. The frame type, material, louver size, and panel configuration you choose will determine how your shutters look, how they function, and how long they last.
If you're considering shutters for your Northern Idaho home, let's talk through your windows, your layout, and your priorities. A local consultation gives you the chance to ask the questions that don't come up in a blog post — and it helps you avoid the common mistakes most homeowners never even know to look for.
Luxe Window Works serves Coeur d'Alene, Post Falls, Sandpoint, and surrounding Northern Idaho communities. We specialize in custom shutters, motorization, and smart home integration for discerning homeowners who want clarity, transparency, and long-term performance.
Ready to explore your options? Contact us for a consultation — no pressure, just practical guidance from someone who's seen every configuration, every obstruction, and every shutter material in real Northern Idaho homes.
luxewindowworks.com | 208-660-8643 | mark@luxewindowworks.com
About the Author
Mark Abplanalp is the owner of Luxe Window Works, a trusted custom window covering dealer serving Northern Idaho. With over 24 years of hands-on industry experience — including measuring, installing, and consulting — Mark brings clarity to complex decisions. He's worked with top brands including Hunter Douglas, Alta, Norman, and Graber, and specializes in helping homeowners choose the right solutions for their space, style, and climate.
Proudly serving Coeur d'Alene, Post Falls, Hayden, Rathdrum, and Sandpoint, Idaho.
Have Questions About Your Windows?
Our team offers free in-home consultations throughout Northern Idaho. Get personalized advice for your specific situation.